If you followed the previous part of this tutorial you should now have a basic pfSense installation available with a default configuration, let’s now dig in and set it up for our needs. I am definitely not a pfSense wizard, so let me know if I have made any mistakes in the below or of you have suggestions on improving the process.
Logfiles
By default pfSense only keeps a very limited amount of logging information, since we have created a 2GB hard drive image we have plenty of space to play with, let’s expand this to 20MB per log file (which will use in total about 350ish megs as you can see)
You can access this screen by going in the Status->System logs panel and clicking on Settings at the far right

after you change the values here, you should save your change and reset log files to make all files expand to their new size.
SSH access
As much as the pfSense GUI is very extensive, it is sometimes advantageous to be able to get a shell on the pfSense server itself, this is easily done via the GUI in the System->Advanced page

As you can see I have disabled password logins, as much as via firewall rules we will limit access so that nobody besides Dom0 will be able to connect to pfSense on port 22 (among others) I find it’s less of a hassle to just be able to use my Dom0 ssh key to log in (I also usually copy the public key to any VM I create for easy access from Dom0).
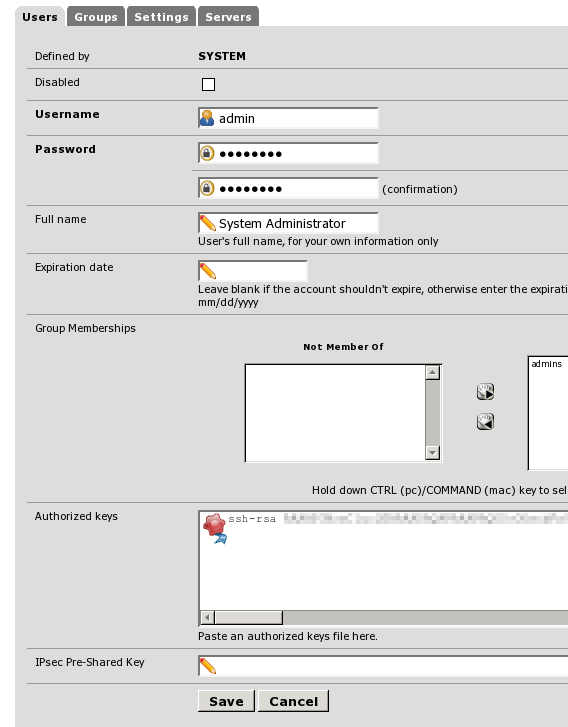
The key can be added in the System->User Manager screen, where you can click the ‘edit’ button next to the admin username and add it

after this is done you will get a notification

and from then on ssh will be enabled. For example let’s ssh in and take a look at the system log file, note that ssh-ing in as the admin user will start the same console that was seen earlier as part of the VM installation
*** Welcome to pfSense 2.2.4-RELEASE-pfSense (amd64) on pfSense ***

 WAN (wan)       -> vtnet0     -> v4/DHCP4: 192.168.1.105/24
 DOM0 (lan)      -> vtnet1     -> v4: 172.31.1.1/24
 DEVEL (opt1)    -> vtnet2     -> v4: 172.30.1.1/24
 BLOG (opt2)     -> vtnet3     -> v4: 172.30.2.1/24
 OPT3 (opt3)     -> vtnet4     ->
 OPT4 (opt4)     -> vtnet5     ->
 OPT5 (opt5)     -> vtnet6     ->
 OPT6 (opt6)     -> vtnet7     ->
 OPT7 (opt7)     -> vtnet8     ->
 OPT8 (opt8)     -> vtnet9     ->
 OPT9 (opt9)     -> vtnet10    ->
 OPT10 (opt10)   -> vtnet11    ->
 OPT11 (opt11)   -> vtnet12    ->
 OPT12 (opt12)   -> vtnet13    ->
 OPT13 (opt13)   -> vtnet14    ->
 OPT14 (opt14)   -> vtnet15    ->
 0) Logout (SSH only)                  9) pfTop
 1) Assign Interfaces                 10) Filter Logs
 2) Set interface(s) IP address       11) Restart webConfigurator
 3) Reset webConfigurator password    12) pfSense Developer Shell
 4) Reset to factory defaults         13) Upgrade from console
 5) Reboot system                     14) Disable Secure Shell (sshd)
 6) Halt system                       15) Restore recent configuration
 7) Ping host                         16) Restart PHP-FPM
 8) Shell


Enter an option: 8

[2.2.4-RELEASE][admin@pfSense.localdomain]/root: clog -f /var/log/system.log
Jan  1 07:20:09 pfSense syslogd: kernel boot file is /boot/kernel/kernel
Jan  1 07:20:59 pfSense check_reload_status: Reloading filter
Jan  1 07:21:01 pfSense dhcpleases: kqueue error: unkown
Jan  1 07:22:24 pfSense check_reload_status: Syncing firewall
Jan  1 07:22:24 pfSense syslogd: exiting on signal 15
Jan  1 07:22:25 pfSense syslogd: kernel boot file is /boot/kernel/kernel
.......
this can be useful if you for example want to see your DNS requests in real time or any other information you want to monitor when debugging issues. After exiting the shell you can enter 0 to disconnect from the console.
Aliases
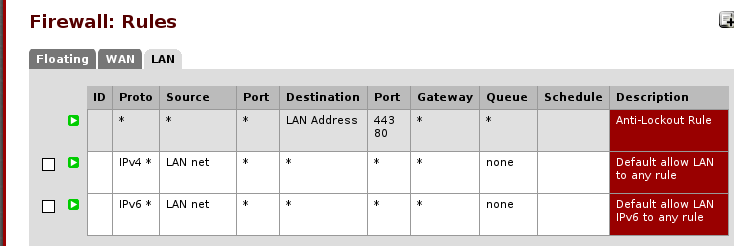
In the default pfSense installation your LAN interface will have autocreated rules that allow connection to any internet address

this is not what we want, as we want our Dom0 to not connect to the internet in general, outside of the debian package servers and that only when we decide to. Therefore let’s remove the autocreated rules to start with a blank slate.

Let’s first start with our LAN interface, first of all let’s rename it to DOM0 to make it more obvious, you can do so by clicking on the ‘Interfaces’ menu item and selecting LAN, just type the new name in the settings page and click on ‘save’

Let’s now create a few aliases, first of all an alias for http/https traffic

and an alias for the debian mirror we are using, feel free to change what is displayed here to your local mirror, which you have configured earlier via netselect

an alias for the local networks we plan to configure, as discussed in the previous part of this tutorial

and an alias for the gateways for all our internal networks (which is basically the pfSense installation)

Miscellaneous services
pfSense will serve as our DNS and NTP server, these can be configured in the services menu, here is the DNS resolver, you can either use this or the more lightweight DNS forwarder, it really depends from your needs.

note that forwarding is enabled to use the already configured DNS server on our network, which we have entered in the general setup page before, you might also have to disable DNSSEC support depending on your upstream DNS server.

and here is NTP

additional ntp servers to use can be found by installing the ntp package and checking which servers it would try to contact by default via using ntpq. Let’s set things up so that our Dom0 and other VMs will use our pfSense installation as an NTP server:
DHCP leases resolution
Above we configured DHCP leases to be automatically entered in pfSense’s resolver, however it seems at least in my install this works correctly only if you start pfSense from scratch, in our setup instead we have a systemd unit that saves/restores it, which is faster, and in this case it seems the leases appear not to be updated correctly in DNS when a new VM is spun up, which means that you will not be able to resolve your VM hostnames.
To get around this I personally updated my virtualbox VM start scripts to also automatically restart dnsmasq on pfSense after the VM is up, to restart DNS this wget-based script could be used
#!/bin/bash
PFSENSE=172.31.1.1
TMPDIR=/run/user/$(id -u)

trap 'rm -f $TMPDIR/csrf.txt; rm -f $TMPDIR/csrf2.txt; rm -f $TMPDIR/pfcookies.txt; exit' EXIT INT TERM HUP

wget -qO- --keep-session-cookies --save-cookies $TMPDIR/pfcookies.txt \
  --no-check-certificate https://$PFSENSE/status_services.php \
  | grep "name='__csrf_magic'" | sed 's/.*value="\(.*\)".*/\1/' > $TMPDIR/csrf.txt

PPASS=$(gpg2 -q --decrypt ~/bin/pfsensepass.txt.gpg)
wget -qO- --keep-session-cookies --load-cookies $TMPDIR/pfcookies.txt \
  --save-cookies $TMPDIR/pfcookies.txt --no-check-certificate \
  --post-data "login=Login&usernamefld=admin&passwordfld=$PPASS&__csrf_magic=$(cat $TMPDIR/csrf.txt)" \
          https://$PFSENSE/status_services.php  | grep "name='__csrf_magic'" \
            | sed 's/.*value="\(.*\)".*/\1/' > $TMPDIR/csrf2.txt

wget -q --keep-session-cookies --load-cookies $TMPDIR/pfcookies.txt --no-check-certificate \
    "https://$PFSENSE/status_services.php?mode=restartservice&service=dnsmasq&__csrf_magic=$(cat $TMPDIR/csrf2.txt)" \
    -O /dev/null
lines without a \ at the end are supposed to be on the same line (in case the browser window is narrow enough to word-wrap). Dnsmasq is the pfsense DNS forwarder, if you are using the pfSense DNS resolver instead you will have to change the URLs above.
Note that as for other scripts I use, I keep the passwords and/or other sensitive information in an encrypted separate file (in this case look for PPASS in the code above) that I read via gpg. The above is adapted from the pfSense website backup example 1, it is great that the pfSense GUI is easily scriptable.
An alternative approach to scripting
Since we have enabled SSH access earlier, we can restart the service from the command line over ssh as well, if you prefer to go this route I would suggest creating a new admin account (note the group memberships below)

in order to be able to have a bare shell access when you log in instead of the pfSense console application, note that you have to explicitly add permission to this user to use shell access in order for ssh to work.
This setup requires sudo, which is available among the System packages

once installed it can be configured under System->sudo to allow our scripts user to run sudo without typing a password (note the last line here)

after this is done we can simply run something like this to restart the service if needed without having to go through the GUI via wget
Starting the pfSense developer shell....

Attempting to issue restart to dnsmasq service...

dnsmasq has been restarted.
Additional interfaces
When we configured the pfSense VM, we gave it 16 network interfaces to allow for very fine-grained firewalling control, in order to make it easier to administer them they should be renamed so that they have the same names as the VirtualBox networks connected to them: I will give here an example on how to configure the first non-core interface, all the others will be the same with different names and static IPs.
Depending on the VirtualBox package you are running, you might have to stop the VM before being able to make changes to its network via vboxmanage (this is a known issue present in early 5.0.x releases), if you have to do this I also suggest stopping any other VirtualBox VM that might be running as the systemd unit might end up halting them as well.
In this call we are working on the first available pfSense OPT interface (OPT1) and the first available VirtualBox network (intnet3), note that intnet1 and 2 are already respectively assigned to pfSense’s WAN and LAN interfaces that are bridged to our physical and TUNTAP interfaces.
After doing this, in pfSense you would go to the OPT1 interface in the interfaces menu and check the ‘enable interface’ checkbox as well as rename it to the same name you assigned to it in VirtualBox for ease of use.
You would then configure it with in this case our first VM network, 172.30.1.1⁄24, with a static IP address and save the configuration

then you would enable DHCP on this interface in the ‘DHCP server’ services menu and configure the addresses it would give out

Note here I am selecting the full network as available DHCP range, if you plan to set up some hosts with static DHCP you should limit this to have some addresses available for static mapping.
I also add the pfSense gateway as an NTP source in the settings later on

before saving. After setting up new interfaces I also usually reboot pfSense from within the GUI to make sure everything is set up correctly.
In the next step of this tutorial we can now start looking at firewall rules, one of the main benefits of running this type of setup.
- Initial release - 2016-01-01
- New highlighting for commands - 2017-12-03
